.svg)
21 March, 2025
Create a PowerPoint mask: Tutorial for experienced


After drawing up a first portrait of slide masks Powerpoint, about their advantages and main features in our article entitled “Create a Powerpoint mask: Tutorial for beginners” , here is a second article that will allow you to go further and configure your masks by fully understanding the difference between masks and layouts and how to use them to your advantage.
What is the difference between a mask and a layout?
On a purely practical level, there is little or no difference between a mask (Master) and a layout (Layout). In both cases, these are canvases or “white slides”, which the author configures and customizes to meet the needs of layout and use, through the creation, positioning and layout of fixed or non-fixed elements, commonly called” editable placeholders ” or “placeholders” in English.
The difference between these two Powerpoint mask categories resides mainly at the hierarchical level:
— It is possible to create as many slide masks as needed
— You can create as many slide layouts as needed, but:
— A slide layout is always attached to a single slide master
At a practical level and varying according to the needs of the author:
— A slide master contains the fixed basic elements of your presentation
— A slide layout contains the non-fixed elements of your presentation: editable placeholders, such as text boxes, images, the logo, color variations, etc.
Creating a Powerpoint mask: 2 distinct strategies
The use of masks and layouts depends on several factors: the overall complexity of your presentation in terms of layout permutations, its desired longevity, or simply the layout strategy of the author of the presentation.
Strategy #1: a minimum of slide masks, a maximum of layouts
This strategy is recommended for those who are new to masks. It allows the author to focus only on the fixed elements of the frame and to fix them in a “parent” mask. These basic fixed elements are generally the following:
— Fixed and recurring decorative elements of the frame
— Fixed position of the slide title
— Fixed logo position
— Presence of the page number
Once the slide master is created and configured, all you have to do is insert new layouts under it and create the desired layouts that will keep the codes and fixed elements configured on this parent master. This strategy uses a mask as a “protection” framework for your content but does not allow you to manage your master sub-layouts properly.
Strategy #2: one mask per main layout type and provisions for sub-permutations
More experienced users will have understood that reducing the number of masters has a practical and rapid advantage, but that it is more beneficial and beneficial to devote more time to creating layouts in order to create a complete and professional document. To do so, here are the steps in the thought process:
The steps to follow
1. Determine the type and number of main provisions beforehand:
Once the content of your presentation has been defined in general terms, a good user of Powerpoint software should be able to draw up a list of the provisions necessary to finalize the editing of your presentation:
- Simple Text Layout
- Image + text layout
- 3-block layout
- Layout with an impacting message
- Layout with Excel table or chart
- Layout with a diagram
- Layout with an infographic
- Layout with image gallery
- Summary layout
- Etc.
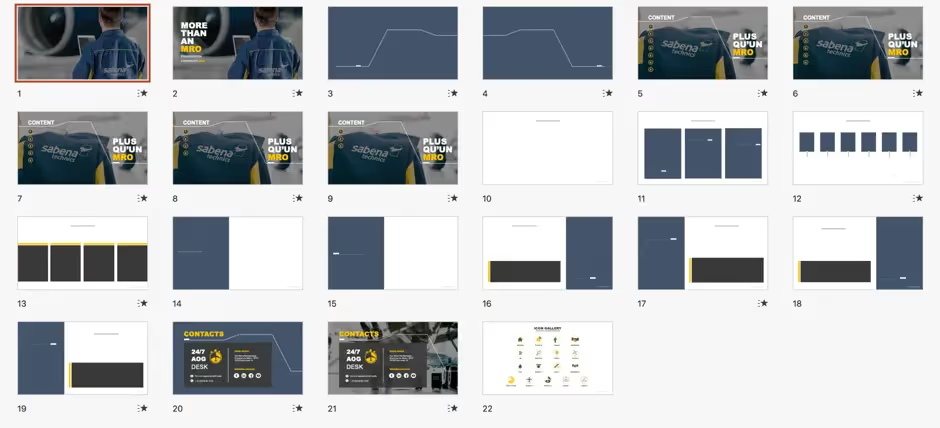
These main types of layouts will be used to create your various slide masks and will then allow you to assign layout variations or layouts to them. Result: an enriched and very solid presentation through the creation of new layout options, while ensuring A slide master “clean” and above all well organized.
2. Determine the sub-permutations of your masks
Continuing with the list above, here is an example of defining sub-permutations that come up often. They are obviously specific to the needs of each presentation, but the same permutations often come up:
Mask image + text:
- Layout Image on the left, Text on the right
- Layout Image on the right, Text on the left
- Layout Text Color 1, Background Color 2
- Layout Text Color 3, Background Color 4
3-block mask:
- Layout Horizontal blocks
- Vertical Blocks Layout
Mask with an impacting message:
- Layout: Central impact message on a flat color background (1)
- Layout: Central impact message on a flat color background (2)
- Layout: Side impact message with image
- “Quote” layout with photo of the author
Mask with Excel table or chart:
- Table layout
- Table layout + comments
- Layout 2 graphics
- Layout: 3 graphics
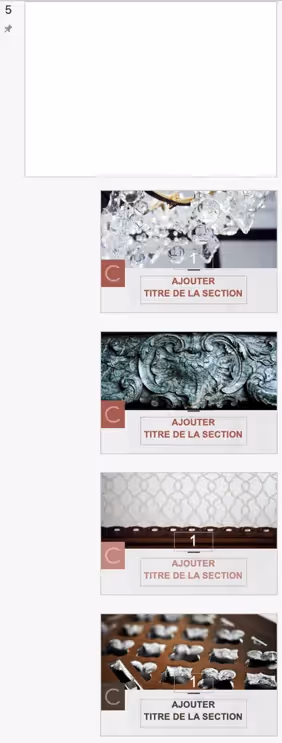
Mask with image gallery:
- Layout 6 images
- Layout 8 images
- Layout 16 images
- Layout: 24 images
Summary mask:
- Layout 5 elements Summary
- Layout 6 elements Summary
- Layout 7 elements Summary
- Layout 8 elements Summary
3. Create your slide masks and layouts:
— Creating masks and their layouts is quite easy by getting started with the Powerpoint software:

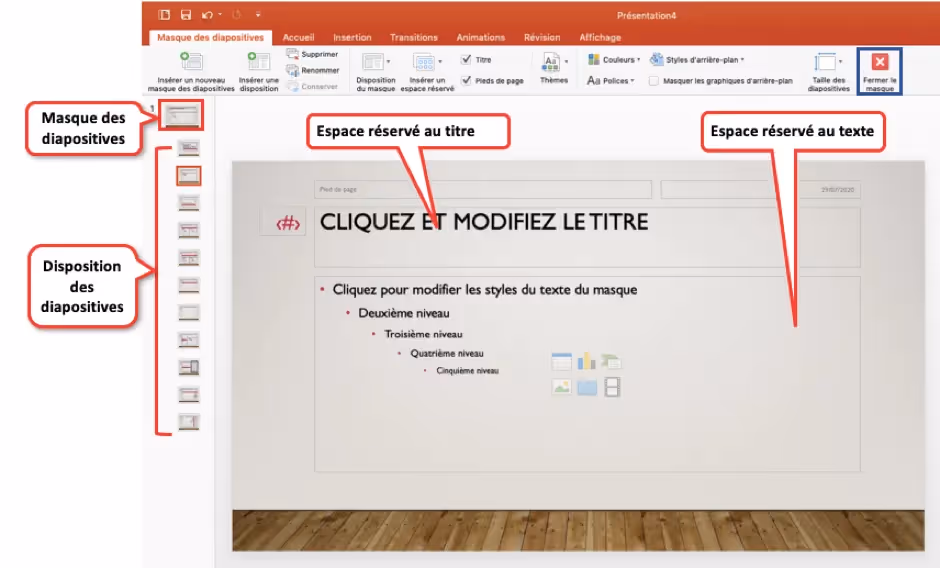
On the Slide Master tab, you'll find shortcuts for:
- Insert a new slide master
- Once created, simply right-click on the thumbnail of the mask created in the previous step and select “Insert layout”

Configuration tips for your masks and layouts
Although it is possible to configure the color palette, fonts, and transitions for your Powerpoint presentation when working in the “normal” view, we recommend that you make these basic adjustments in the masks directly. It will protect your slides if they are copied, pasted, exchanged, and shared as part of a collaborative presentation setup.
Nomenclature
In order to assemble a professional document from A to Z, we advise you to clearly name your arrangements in the masks. This will give you a solid foundation and allow future users of your document to work on a precise and complete document in terms of the layout options offered:

To do so, right-click on a layout tile and rename it
Customize the color palette of your document
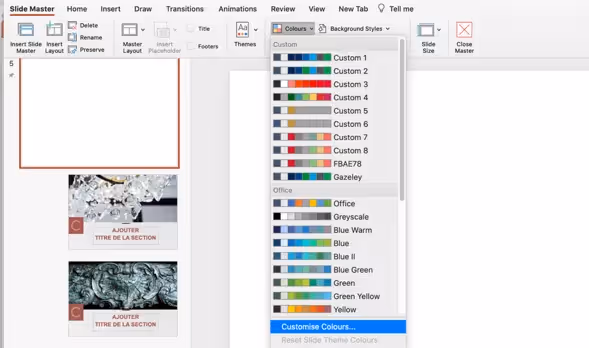
- Go to View > Slide Master
- On the Slide Master > Colors > Customize Colors tab
Customize the basic font of the document
This is the same approach as for the color palette:
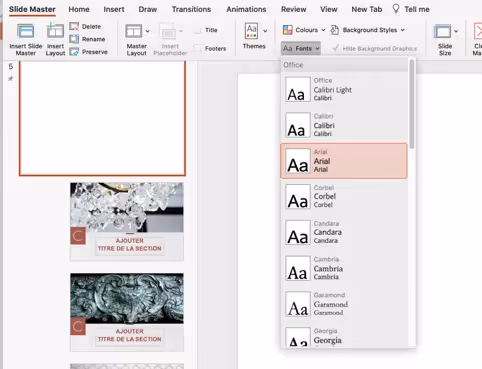
- Go to View > Slide Master
- On the Slide Master > Fonts tab
Careful! Powerpoint does not allow you to select fonts other than the predefined ones. Another reason to use office fonts for your presentations. If you want to go deeper into the subject, you can consult our article entitled The importance of typography in a Powerpoint presentation
Insert page number

- Go to View > Slide Master
- On the Insert > Header and Footer tab
- Once the dialog box is present, check the Slide number box > Apply to all
- A text box containing the code ‹ #› will appear at the bottom right of your masks. This text box will become a fixed element on all the sub-layouts of your masks.
- If some of your layouts require a change in layout or position of your page number, then you will need to create a different mask that will group the layouts that require a particular page number treatment. This logic is valid for all similar operations for creating fixed or editable elements in your Powerpoint masks and layouts.
The creation of variable elements is done through the insertion of “placeholders” or reserved spaces that you add to your slides as shapes or objects. The size and position of these elements will become fixed elements, and the content will remain editable in the 'Normal' view of your presentation.
Call on the Powerpoint Agency!
If you want to work with a dynamic, responsive agency capable of developing a winning strategy in creating a set of Powerpoint layout masks that will meet your slide needs, we invite you to contact our team by going to the form next. Pokeslide will support you in your projects to create, beautify or layout your Powerpoint presentations.
Our articles in the same theme:
Presentation design consultant who transforms complex ideas into clear and compelling slideshows. Expert in PowerPoint (templates, advanced animations, infographics) with a strong eye for visual storytelling and brand consistency. Experienced working under tight deadlines, supporting executives and sales teams to create presentations that engage, persuade, and leave a lasting impression.
.avif)